SuperPod Placement within your home

SuperPod Placement within your home

Placement of your Pods is a very important consideration to make sure you get the best coverage from your JT Total Wi-Fi service. There are many aspects to consider such as obstructions, particularly thick (granite) walls, location of available electricity sockets and so on. The following could give you some ideas about how to get the best from JT Total Wi-Fi.

Pod Placement on Setup


Where should I place my SuperPods?
One SuperPod should be connected directly to your JT Router and so will probably be next to it. If this router is not in an ideal place (e.g. not near where Wi-Fi is being used), you can place this first SuperPod at a more suitable location as long as you have a long enough Ethernet cable (or if, for example, your home already has some cables in place). If using a cable other than the one supplied with the JT Total Wi-Fi pack, make sure you use high quality ethernet cable to ensure maximum speed. Cable quality is described by a Category (“Cat”) rating, which can usually be found printed on the cable:

  • Cat 5e (the most common cable used today) is sufficient for gigabit speeds over short cable lengths.
  • Cat 6 minimum is needed to support Gigabit speeds over longer cable runs. If you are having cables installed in your home (sometimes called “structured cabling”), we recommend using Cat 6 as a minimum.
You can plug your other SuperPod(s) in just about anywhere in the home to optimise coverage. As the service optimises itself over time, it may make suggestions on moving individual units if it is experiencing problems (such as interference from other electrical equipment) in certain places.

All pods like to be positioned towards the centre of the home and less on outside walls so as to form a strong core network. If there are large metal objects or furniture between pods, bringing the pods closer together will reduce the connection strength loss between pods.


What is the Range of a SuperPod?
It is difficult to provide exact numbers because of all the variables and configurations inside a home. Each pod typically has a range of 9 to 12 metres through walls (or up to 24 metres without obstructions). The JT Total Wi-Fi service measures each pod's performance and creates the best pod-to-pod connections for you after optimisation. You can see each pod's performance in the Homepass app, and you can easily add extra Pods if you find you need better coverage in your house after testing.


Will pods work when plugged into a surge protector or extension cord?
You can plug a pod into a power strip, adapter, extension cord or surge protector.

Unlike Power Line Communication (PLC) based devices, data is not transmitted via the power lines. Plume pods connect to each other via Wi-Fi or Ethernet and will still work as long as they continue to receive power from the outlet.

We do recommend that, where possible, they are plugged into a socket on a vertical wall. SuperPods have “beam forming” technology (which focuses Wi-Fi signals where required) and this works best in this position.


How many SuperPods do I need?
The number of pods you'll need will vary based on a number of factors, such as the layout, construction of your home, how many devices you plan on using and the speed of your internet connection.

The JT Total Wi-Fi package includes two SuperPods, which are enough to cover up to a 2-bedroom apartment or an average home. Larger homes may require one or more additional pods. You can have as many as you like in your home.

Please read advice HERE about how to locate your Pods in the best position for best coverage. Please contact JT if you wish to have additional SuperPods to increase your coverage at any time.


How to set up JT Total Wi-Fi within my IT cupboard or Distribution Cabinet?
It is becoming more common for individual homes to have IT cupboards or Distribution Cabinets where all electronic information flows into the home. In addition to the different type of connections, these locations may contain other equipment needed to use each service. For example, in some homes, these locations also contain the power and/or other television connections for the home.

Potential Issues


The primary issue with these locations regarding Wi-Fi and where to locate pods, has to do with Wi-Fi signals being blocked. These locations often contain racks for mounting network and other equipment. These are usually made entirely out of metal or reinforced with metal and sometimes have glass doors. In addition to the cabinet itself, a lot or copper wires will be coming into the same location. All of these materials block Wi-Fi signals, reducing range and degrading performance.

When the gateway pod (first pod connected by Ethernet) is placed inside an IT closet or distribution cabinet, the Wi-Fi signals going to and from your devices and other pods are further weakened. This signal loss is in addition the normal degradation experienced when going through the walls and any other obstructions in the rest of the home.

Another potential issue is the devices that these locations contain can generate radio interference, which can also further impact the performance of Wi-Fi.

The Wi-Fi signal from the pod also has the potential to cause interference to sensitive audio equipment sometimes found in the racks and media centres.

The gateway pod is the most important part of your Plume network and should never be placed inside these cabinets and closets if at all possible.

Solutions

If you have such an IT closet or distribution cabinet, you will most likely have Ethernet and coaxial connections going to other parts of the home. If you can, you should connect the first pod (gateway pod) to the JT Router in the IT closet or distribution cabinet using the far end of one of these connections for best Wi-Fi distribution.

It is possible and recommended to connect multiple pods by Ethernet or other hardwired connection to the JT Router (or ethernet switch, if one is used) in this manner when the wiring is already available. Having multiple gateway pods (connected by Ethernet) can help improve Wi-Fi performance.

Five things in your home that can kill your Wi-Fi

In many of our homes, Wi-Fi signal is not what it could be, should be, and what you could make it to be. Electromagnetic signals, which is what Wi-Fi routers use to transfer their data, are vulnerable to many types of barriers which can commonly be found in our homes.

Here is a list of the lesser-known obstacles getting in the way of your Wi-Fi:

Five things in your home that can kill your Wi-Fi
  1. Mirrors

    It might seem odd to some, but mirrors are a major source of electromagnetic interference in a modern home. The mirror metal backing that reflects light so well also reflects your Wi-Fi signal - the better part of it - and maintains the Wi-Fi signal structure relatively well. That reflection then destructively interferes with your Wi-Fi router’s transmitted signal and decreases its strength. The effect increases with mirror size and decreases with distance between your router and the mirror. Wi-Fi signals that need to pass through one or more mirrors may result in rather large dead spots in the home.

  2. Households Appliances

    Did you ever get the idea to hide that horrendous eyesore of a router behind your big screen TV? Or to squeeze it between your stereo equaliser and that big subwoofer next to it to keep it out of sight? That solution might somewhat lessen the injury to your acute sense of aesthetics, but it will also significantly worsen your Wi-Fi signal. Stunting the Wi-Fi signal strength at its source will lessen the overall range.

  3. Reinforced Concrete or Granite

    Concrete and granite are dense materials and are only semi-permeable to electromagnetic signals, especially the higher 5GHz. The reinforcing steel in the concrete, somewhat depending on its denseness, pulls even more juice out of your signal. The 5GHz band is the faster of the two Wi-Fi bands but has severe penalties for passing through concrete and granite walls it is no secret that fast Wi-Fi in even small high-rise apartments can be a challenge.

  4. Energy Efficient Windows

    Windows coated with transparent metallic films such as Low-E (low emissivity) to help with energy consumption can kill your Wi-Fi signal in a similar way to mirrors. The metallic films reflect light and other waves, including Wi-Fi signals, so, these are the typical double-pane windows that are great for the environment, are not so good for wireless signals.

  5. Metallic Blinds

    Did you ever wonder why Wi-Fi signal on your terrace can be so horribly bad, but in the room just a foot away it is excellent? If you have metallic blinds in that room, then you may have your answer. Metallic blinds will diminish your Wi-Fi signal. Add to that a double pane of windows with metallic blinds and you may find your Wi-Fi router not doing the job.

How to Fix it with Plume?


One could go around the home removing mirrors, knocking down walls, pulling up the blinds and keeping windows open to help give your Wi-Fi a fighting chance, but there is a more elegant solution with Plume Pods. Improving the Wi-Fi coverage requires more Wi-Fi access points spread out in each room of the home. This gives your Wi-Fi enough oomph to power through the mirror or better yet go around it through the hallway Plume Pod.

Troubleshooting Performance Issues


What to do when receiving your ISP Speed Test results?
Plume's built-in ISP Speed Test measures the speed of the link from your Gateway pod to the internet using Ookla's speed test servers. If those results are not close to the speed you are expecting, these tests will help you find the cause. Note that the regular speed tests use up bandwidth, which will be an important consideration if you have a capped broadband plan. If you do, please make sure that Speedtest is turned off in your App – or else consider upgrading your plan to an unlimited service.

If you are not receiving the speed you expect, here are a few tips:

Check the Ethernet connection


The Ethernet connection between the Gateway pod and the Router should always be checked first if the Speed Test results in a lower speed than 100 Mbps and the expected ISP download speed is greater than 125 Mbps.

  1. Make sure the Ethernet connection on the Gateway pod is secure and run the Speed Test in the HomePass app to get a baseline. If securing the connection fixes the issue, you can stop here.

  2. Switch the ports being used for the pod on your router and run the ISP Speed Test from the app. If the results have improved and now match your expected speed, there may be an issue with the router.

  3. Swap the Ethernet port on the SuperPod or swap it with another pod. Perform the Speed Test again using the HomePass app. If the results have improved, the port on the pod may have an issue. Contact JT support for next steps.

  4. There may be an issue with the Ethernet cable itself. Ensure the cable is gigabit capable (Cat 5e or above). Swap the Ethernet cable with a known working cable and run the Speed Test again.

Plume is connected directly to the JT Router


  1. Power-cycle your router for 30 seconds while keeping the Gateway pod still attached to it via Ethernet. Run the Speed Test in the HomePass app once again to get a baseline. If this result is fine, the issue may have been a temporary slowdown of your connection.

  2. Unplug the pod from the router and plug in a laptop/computer via Ethernet. Wait until Plume has come online. You may need to Power-cycle the router again.

  3. Open a web browser on the computer and go to jtglobal.speedtestcustom.com.

  4. Leave the server at the chosen default and click on GO to perform a speed test. Compare this to the result from the HomePass app, which should be very similar.

If the test results are still poor, the issue may be with the router, your core connection or wiring to the ONT. Contact JT for assistance.

Router or modem/router issues that affect speed


  • QoS settings - If you have adjusted QoS settings on your Router, make sure that all pods or the ports they are using are set to the highest priority. This will also ensure that devices connected to Plume are properly prioritized too.

  • Firmware - Firmware on routers need to be updated on a regular basis. Check with JT Support for updates.

  • Security, other settings or defective equipment - Check with us if there are any other settings that could be potentially slow down your Pods or to confirm if the unit is no longer working properly.

Reason for ISP Speed Test differences


The cause of the different results between the different speed test methods is due to the servers used for each test. The HomePass app and jtglobal.speedtestcustom.com always default to the closest server which is chosen based on ping.

You will usually see a figure which is less than the headline speed you may feel should be available. For example, if you subscribe to a 1,000Mb (1Gb) service, you will receive an average speed something between 930 and 944Mb based on the overheads that are implicit in the IP/Ethernet transport.

Easiest way to explain is think of postage with a 1kg weight limit – your contents can only be 944g because the parcel box / address label / customs label etc weighs 66g. You need to put your contents in the box with the addresses and labels so that it can get sent to the other end – if your post van can carry 1000 parcels, you would have sent 1000kg, but only 944kg of contents.

The same applies with data – you need to wrap your data in various IP/Ethernet ‘overheads’ so that your data can be sent to the far end. Whilst the pipe allows you to send 1000Mbit of data, it includes the IP/Ethernet headers, which means you can only send 944Mbit of contents.

Upstream devices using bandwidth


JT Total Wi-Fi will automatically run an ISP Speed every three hours if the network is idle. However, the activity of devices connected upstream from the Plume network like the devices directly connected to the router are not monitored. This means that the automatic ISP Speed Tests will run even while those upstream devices are using the internet and the speed test results will reflect this.


How can I fix poor pod connection issues?
If a pod displays “Poor health” and you are noticing an impact, there are a few steps you can take to improve its health:

Move pods closer to each other but be aware of thickness of “dense” material


  • Remember that pods work as a team, so they want to be close enough to communicate with one another. Consider distances around 9m-12m (30'-40') for SuperPods, which can still vary largely depending on the building materials used in your home.

  • Homes with dense walls/floors need pods closer together than those with lighter construction. Arrange Pods where you can minimise the amount of dense material between them. Close does not necessarily mean least obstructive material.

  • Arrange your Pods as a “Core” in the middle of your home (not against outside walls).

  • Even moving a pod to an opposite wall in the same room can sometimes help create a stronger and more reliable connection for that pod.

  • Place the pods on the inside walls of the home, to build a strong core network to improve performance.

Hardwire pods to your router or switch


If your home is wired and you have available ports that connect back to a switch or router, hardwiring pods to those ports to other areas in your home will improve performance. This is a great opportunity to allow you to place your pods further apart as they do not need to be using wireless for core connectivity. See HERE for much more information.

Keep Pods in the open and away from objects


  • Avoid metal or other reflective objects in between your pods.

  • Avoid obstacles in the way of connecting pods (such as kitchen and laundry appliances, metallic piping, metallic waste bins, electrical equipment or large mirrors).

  • No large furniture right in front of the pod.

  • Keep in minds that granite, fish tanks, people and other large bodies of water can also block and reflect Wi-Fi signals so avoided locating Pods where these might block the signal.

Eliminate sources of interference


  • Find sources of interference and eliminate them. Consumer electronics like baby monitors, cordless phones, video senders, microwaves, etc. will cause interference on the same channels used by your Wi-Fi.

  • Ensure your old Wi-Fi is turned off.

  • Immersion and other electrical heaters can cause interface when they switch on and off, so avoid locating Pods close to these.

  • Move your pods further away from sources of interference.

If an issue arises with the connection health of one of your pods, you will be notified through the App. One of the features of the HomePass App is that you can view the connection health of a pod at any time by selecting any blank space of the App’s landing screen, followed by the pod you’d like to check.


My Wi-Fi Connection is slow!
First check that your core internet speed is up to scratch (as above). If you can, see what you can get using a cable (ethernet) connection.

Here's what could be slowing your Wi-Fi down:
  1. One or more pods are too far away from another pod.
    • Plume SuperPods should be no more than 12m (40 feet) from each other.
    • Ensure that you have a strong core network in your home, keeping pods in the centre and not on exterior walls.

  2. Not enough pods are connected in your home.
    • If your signal is constantly weak, this is an indicator.
    • If you have large or complex property additional Pods can be obtained from JT.

  3. One of your pods may be offline.
    • Check if any of the LED of the pods is slowly pulsing, which means it is disconnected.
    • You can go to the HomePass by Plume App, select Settings on the menu and check the status of each Pod.
    • If one or more Pods are offline, follow the steps described HERE to resolve the issue.

  4. Router issues: Restart your JT Router to fix certain connection issues.
    • Disconnect your Router power supply
    • Wait 30 seconds
    • Reconnect your Router to power

  5. Internet slowdown: We may be experiencing a service slowdown in our core network. These are usually temporary and will show up on your Speed Test (in the App). You can contact JT Support to get more information.

  6. Make sure your old Wi-Fi is disabled on your router. Click HERE for instructions on disabling your Wi-Fi on your router to eliminate interference.

  7. Multiple Wi-Fi networks are running in your area. Try moving your Pods away from the outside walls to avoid the additional interference and promote a stronger core network.

  8. Look for interference from other sources such as: cordless phones, baby monitors, video senders, microwave ovens and other electronics. Many of these devices use the same bands as your Wi-Fi and cause interference.

Also read the FAQ on Top Five Things in your Home which are killing Wi-Fi (above)


What is Optimisation?
Every 24 hours, the JT Total Wi-Fi system conducts an automatic optimisation of your network. During this time, it may change channels or routes to make sure that each device receives the bandwidth required for it to function to its best. As a result, when you look at the App on a frequent basis, you might see devices connecting to different SuperPods (sometimes, it might not appear to be the nearest) or different topography of your network. Do not worry – this the JT Total Wi-Fi system working its magic to make sure you get the best performance.

Indeed, when you first install your Pods (or move one of them), you may notice bigger changes and improvements each time you look, especially for the first seven days. This is when the most intense optimisation activity takes place.


Does hardwiring pods improve Wi-Fi performance?

Does the system support Ethernet Backhaul?


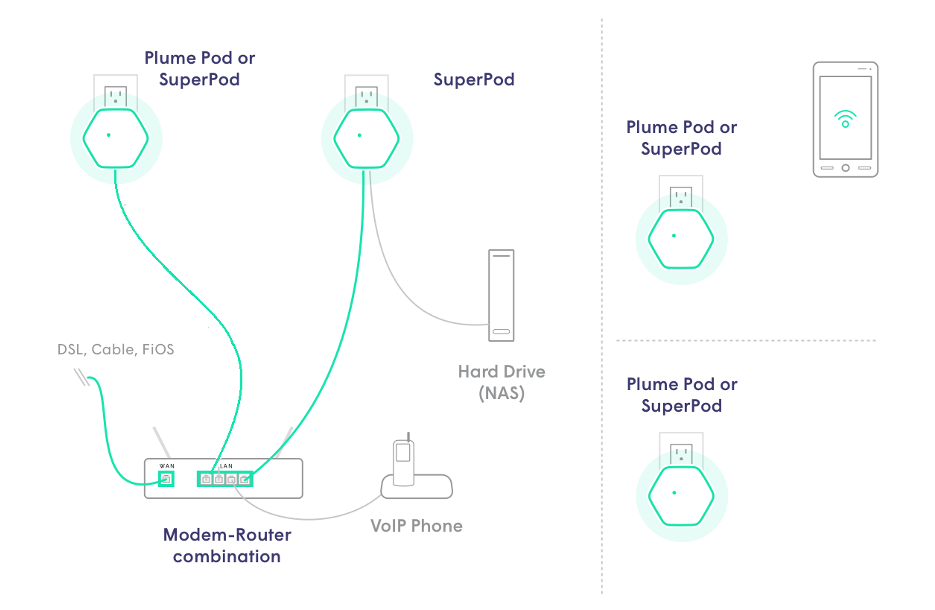
Absolutely. This means you can setup multiple gateway pods by connecting them directly via Ethernet to deliver the fastest possible performance to your devices. If you have Gigabit capable cabling (Cat 6) then this will connect each pod at those speeds rather than the maximum “over the air” pod to pod connection speed of around 650Mb. The backhaul is the connection between the pods going to your Router and is the core of your network.
Plume support Ethernet Backhaul


An Ethernet switch can also be used to further expand how many pods are connect by Ethernet

How does hardwiring pods improve the network?


Having Ethernet cabling in your home provides a large advantage in terms of the Wi-Fi speeds you can achieve. If you can install this while redecorating your home, it is a good investment (and make sure you use proper Cat 6 cabling).

When Ethernet is not available throughout the home, which is the case of most people, our pods will use Wi-Fi to backhaul the network traffic between the pods. However, if you have Ethernet in your home, you can connect the pods to the Ethernet jacks in the home and that backhaul traffic will travel over the Ethernet cable. In addition to avoiding potential Wi-Fi signal strength issues between pods, this leaves more airtime available for the rest of the Wi-Fi network and devices for increased Wi-Fi speeds.

Also, because you are using the Ethernet to backhaul traffic instead of Wi-Fi, you may be able to space the pods a little further apart since their connection to each other is no longer over Wi-Fi. Just make sure you are not creating coverage gaps for your devices.

Indeed, in some cases, you may need such connections. For example, if you put a SuperPod in your garden shed or garage, this may be just too far away from the core network in the house for a reliable wireless connection. Here, you could connect the remote SuperPod to your Router (or to another SuperPod by “daisy chaining” it – see below) by Ethernet and get maximum speed out in your garden.

Can pods be wired to each other (daisy-chained)?


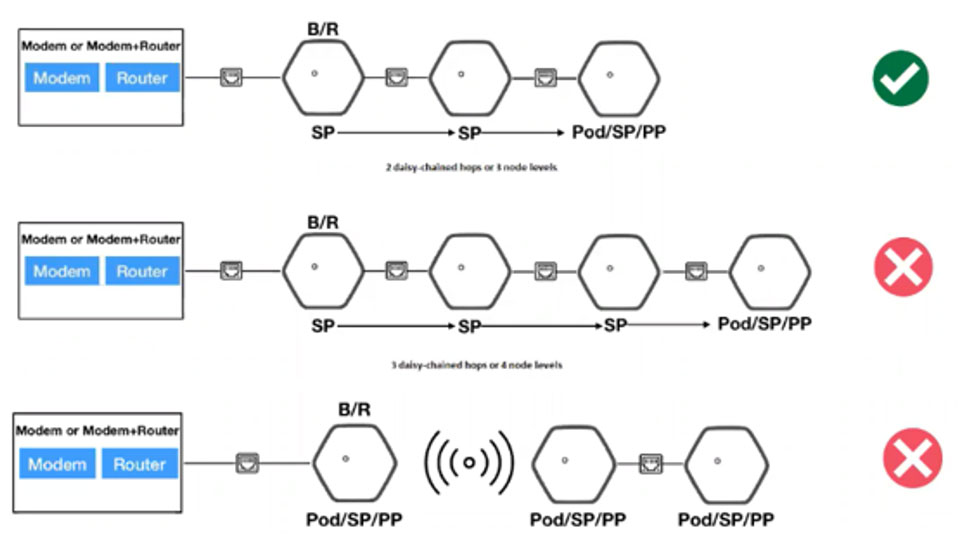
Yes. You can wire pods to each other in a series of up to 2 pod-to-pod hops (we do not recommend more than 2 hops as below). It is important to note that you should not wire pods to each other after a wireless hop as this will cause instability.

Pods can be wired to each other


What else can I use the Ethernet port for?


If you are not using the Ethernet port for backhaul connections, you can use the port for connections to your wired clients, like an Xbox or desktop PC. Even if your device is capable of both Wi-Fi and Ethernet, plugging a normally static device into the free Ethernet port of a convenient nearby pod will help free up more airtime for the Wi-Fi connections of other wireless only devices. And also potentially give you faster speeds on older devices (where early Wi-Fi chips can limit speeds to as low as 60Mb).

Use the port for connections to your wired clients


An Ethernet switch can be connecting to the pod's Ethernet port to further expand how many devices are hardwired to that pod.

Do not connect devices by Wi-Fi and cable at the same time, as this can cause network loops

What kind of Ethernet cable do you recommend?


You can use any quality Ethernet cable to hardwire your pods, although we recommend Cat 6 or CAT 7 to ensure Gigabit speeds over longer runs. Cat 5e is typically suitable for short connections.