I’ve just got my SuperPods. How do I install them?
Download the HomePass app

You should first download the HomePass app from the Google Play or iTunes app stores (search for “Plume Wi-Fi” in either app store). Ensure you select the app published by Plume Design Inc with the Plume logo as here. This app will walk you through the process of setting up your home Wi-Fi network.


Please ensure you are connected to the local (European) App – if your Apple or Google account is based elsewhere, you may have default access to the wrong App version. If you are unsure, in the Google Play store, you can look at the “About this App” section on the App store and you’ll see the letters “eu” in the Version number.
Also, make sure you have Bluetooth enabled on your smartphone since this is used for the initial connection between the App and the Pods. If you do not want to use Bluetooth afterwards, you can turn it off after you have completed installation – it is no longer required.
Log into your Plume Account on the App
- Launch the HomePass app and select the lower option which is “Log In” (Android) or "Sign In" (iOS) - NOT “Set-Up Plume”.
- You will have received a Password reset e-mail from Plume directly. You should use the link in this e-mail to create your own password for your Plume Account.
- The App will prompt you to enter your e-mail (use the one on which you received the password reset e-mail) followed by the password you chose.
- If you have forgotten your password (or have not been able to reset it from the e-mail), click on “Forgot Password” in the Log/Sign In screen, enter your e-mail on the next screen and the system will send you a password reset link.
- If you have forgotten the e-mail you used, check the e-mail on which you received the original password reset mail. Otherwise, please contact JT Support.
- You’ll now be presented with the overall steps to get your first pod connected. This will become the Gateway pod of your network. The grey info buttons will bring up additional details for each step.

Connect one Pod to your JT Router and plug it in
The App asks you to connect your first pod to the Modem. This means the JT Router.
The basic configuration requires you to connect the first SuperPod directly into one of the LAN ports on your JT Router, using the ethernet cable provided. These ports are GELAN on the picture to the right here - and often coloured yellow.
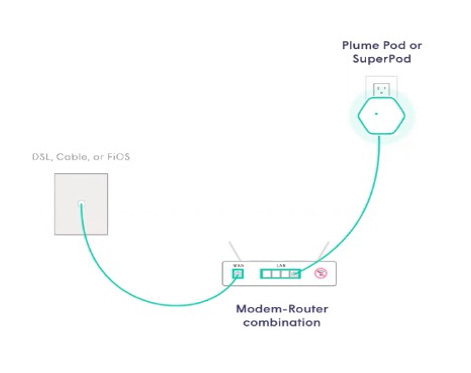
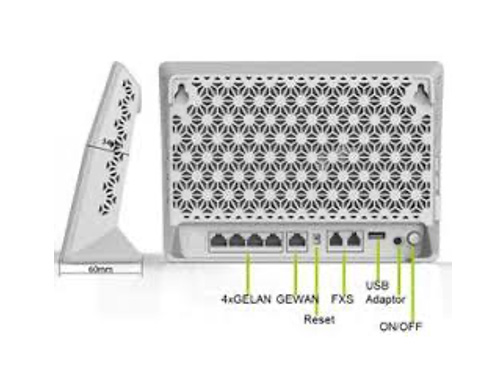
If you have two white boxes delivering your JT service, make sure you connect to the correct one (the Router) which looks like the profile on the right here. You should not connect the SuperPod directly to the first device (the ONT). For more help about which is the ONT and which is the JT Router, see HERE.
- You can connect the Ethernet cable to either of the two sockets on the bottom of the Pod and any of the LAN ports on the Router.
- If you are using a third-party router, try to make sure you are using a Gigabit enabled port (sometimes not all LAN ports are set up for that speed).
- If you already have suitable cables in your house from your JT Router leading to another room, you can connect the first Pod to the end of one of these if it is in a better location to broadcast Wi-Fi around your home.
- If you are in Guernsey and are not connected to JT Fibre, the JT Router will be connected directly to your telephone line socket (probably through a small filter, which separates your broadband and telephone connections).
- If you have more than one JT Router (e.g. you subscribe to JT Managed Cloud PBX service), make sure you connect your JT Total Wi-Fi Pod to the JT Router which, in turn, is connected to Port 1 (of 4) on the ONT.
- Plug the Pod into the power and let it power up - the LED on the Gateway Pod will pulse slowly until it connects to the Plume cloud
Set up your SSID (Wi-FI Name)
- Once you have connected your Gateway Pod and powered it up, click on NEXT on the app and move on to setting up your Wi-Fi Name (often known as the SSID) and password.
- To simplify setup, you can use your previous Wi-Fi Name (SSID) and password. This will allow all your existing client devices to switch to the JT Total Wi-Fi network easily – you will not need to update the credentials on every single device. However, you must remember to turn off your old Wi-Fi network (see HERE) or you might find your devices connecting to the original router which would bypass the JT Total Wi-Fi system (see HERE for questions about this).
NOTE that some devices may require you to re-connect to the Wi-Fi even if you use the same name and password. If any device does not come back up after you have installed JT Total Wi-Fi with the same Wi-Fi name, we recommend you re-attach it to the Wi-Fi network. - Alternatively, this could be an opportunity to set up a completely new Wi-Fi network name and/or password. This would help ensure that the new Wi-Fi network starts off as secure as possible.
- To simplify setup, you can use your previous Wi-Fi Name (SSID) and password. This will allow all your existing client devices to switch to the JT Total Wi-Fi network easily – you will not need to update the credentials on every single device. However, you must remember to turn off your old Wi-Fi network (see HERE) or you might find your devices connecting to the original router which would bypass the JT Total Wi-Fi system (see HERE for questions about this).
Ensure that you are close to your Gateway Pod (remember, Bluetooth must be enabled on your phone!). When the App finds the Pod, you can enter the Wi-Fi name and password. Remember that you can always change these at any time later.

- Plug your other Pod(s) anywhere into convenient electrical sockets. Remember, you can move them afterwards to more suitable positions.
Pod placement is important, and the App gives you some guidance of where to put them. You can read HERE some suggestions about where you should aim to plug them in. Make sure you keep them away from rain and moisture so do not place them outdoors (although you could temporarily plug one in outside if you need it for a specific purpose in your garden but remember to bring it in afterwards). Also avoid the Bathroom as this tends to get damp.
Your Pods will communicate with each other using dedicated Wi-Fi channels. You can also connect any number of them directly to your router or even to each other (in a “daisy chain”) via cable (called “Ethernet Backhaul” – see HERE for more information about the benefits of doing this).
Once you plug a new Pod in, stay close to it with your phone (so that the phone can find the Pod using Bluetooth). Leave them for a couple of minutes to power up and as each one connects to the network; a green check mark will appear on the App screen and the LED will turn off.
Tap on Completed once all pods have been added. - We recommend that you accept the request to Enable Notifications for the App. This will help you remain aware of your home network activity.
- The App will prompt you to join the new Wi-Fi network with your mobile. Tapping “Join” will take you out of the HomePass App and into your phone’s Wi-Fi Settings so that you can join the new network.
Once back in the App, a Welcome Aboard message indicates that the device is now connected and the new Wi-Fi network is operational. - Finally, after you have joined the network, you will be taken to the home screen.
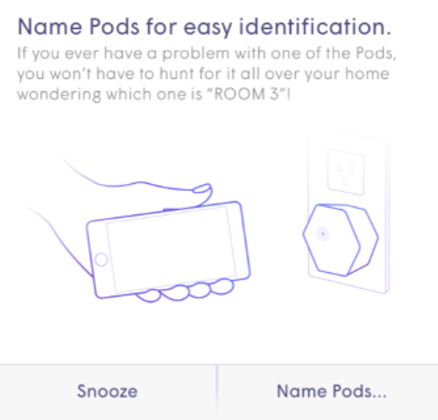
- As an optional step, Pods can be named for easier identification later (we recommend you do this). If you do not want to do this, tap on Snooze.
Hold your phone next to the Pod you want to rename and select Name Pods. You can always change the names later in the HomePass App. We recommend you use meaningful names (such as “Ground Floor”, “First Floor”, “Bedroom” or “Lounge”).
Please make sure you now turn off your old Wi-Fi service
- On the left- or right-hand side of your JT Tilgin Router (depending on the version you have), you will find a small button with either a Wi-Fi logo or green leaf on it. Touch this button quickly to toggle your previous Wi-Fi network off and on. When off, the corresponding LED on the front of the router will go out.
- Note that you can also switch off your Wi-Fi using the interface to the router, if you feel confident using this or by calling JT Support. This will provide additional security by preventing users in your home over-riding the JT Total Wi-Fi Parental Controls by simply re-enabling the previous Wi-Fi network.
Please see HERE for guidance on how to do this.
You have now completed the installation of your new JT Total Wi-Fi network. Over the next few days, it will optimise to create the best performance for your connected devices. The HomePass App will give you information what it will do at each stage.
