Connecting with other Services or Equipment

Connecting with other Services or Equipment

Internet connected Television (such as Sky or other Set Top Box)


If any of these are connected via Ethernet cable to your JT Router, we suggest you retain these, but you could loop that connection through a SuperPod if that is a good location for your Wi-Fi needs (but make sure the Pod is not hidden behind the TV or set top box, since these can interfere with Wi-Fi signals).

If you do not have Ethernet cabling to your TV or Set Top Box, you could connect either of them directly to an ethernet port on the SuperPod and use this to connect back to your Gateway pod (connected to your JT Router) via wireless.

High definition television is best delivered over ethernet cable but, of course, the improved Wi-Fi performance of JT Total Wi-Fi means that wireless connections (if your TV or Set Top Box support Wi-Fi) are also dramatically improved.

VoIP (Voice over IP) Telephony


If you are using the standard JT landline, this remains connected into your ONT and works as before.

If you have a VoIP phone, this works over the internet and may be connected in a number of different ways.

JT Cloud PBX off the ONT

If you have JT’s Managed Cloud PBX service, this will be connected directly to the second port of the ONT and may also have a JT Router connected to it. JT Total Wi-Fi does not have any impact on this service but be careful not to plug your JT Total Wi-Fi SuperPod into this JT Router.

Internet Connected VoIP or JT Cloud PBX

JT’s Unmanaged Cloud PBX service or other VoIP services are typically connected via the internet (sometimes called “Over the Top”). Individual telephones may be connected via ethernet and there is no need to change these – they can remain directly connected into the JT Router or else you can also connect them to the Ethernet port on the SuperPod. If you use a DECT base station, this will also be connected directly into the ethernet network, which can either remain directly into the JT Router or a SuperPod port.

My device is not connecting to Plume, what do I do?


Plume Encryption
Plume Wi-Fi uses the WPA2 standard with AES encryption and a PSK, as this is the most widely used and secure Wi-Fi standard for domestic users. WPA3 is not supported as this has been found to be unsecure and is being revised. Some very old devices may be using WPA, TKIP, WEP and using WPS, these are considered to unsecure to use and are not supported by Plume. If this older device has a wired network connection it can be connected to a Plume pod and receive a faster network connection than it could on the old Wi-Fi.

If you absolutely need to connect an older device to the Wi-Fi, you can re-enable Wi-Fi on your JT Router with a different SSID that can be used specifically for the older device. Some IoT devices use Zigbee to communicate, these devices may need a Bridge to connect with a standard Wi-Fi network.


Wi-Fi devices
  1. Make sure Wi-Fi on your device is on and that you can see your Wi-Fi network name on your device. If you can't find your Wi-Fi network name, please visit your HomePass by Plume App, go to Settings on the menu and verify your Wi-Fi network name. You can easily share this information with new devices that have an active internet or cellular connection.

  2. Make sure you enter the correct Wi-Fi password if prompted.

  3. Make sure that the gateway pod is connected to the modem and is functioning. Check to make sure that your Pods are online. You can always verify the status of your Pods in your HomePass by Plume App Settings.

  4. Turn the Wi-Fi on you device off and then back on. This will force the device to scan for available networks.

  5. Restart your device. Some always-on devices like thermostats and and doorbells may not connect to the new network without a reboot.

  6. Check with your device manufacturer for any special requirements. For example some devices will not connect to an network if the SSID and/or password have special characters.

  7. Reset network settings or choose to "forget the old network" on your device. If your old Wi-Fi is still broadcasting, your device may be switching between networks.

  8. Check if other devices can connect to the Wi-Fi network. If not, contact us for a potential internet outage.

  9. Always make sure that the Wi-Fi on your old router has been turned off. Your device may have difficulty connecting to your Plume network if the old network is still broadcasting. Turning off the old Wi-Fi will also remove a potential source of interference from the environment.

Ethernet connected devices


  1. If your wired device is not connecting to the network, try power-cycling the pod while the device is still connected by Ethernet.

  2. Try another Ethernet cable. Ethernet cables can often fail, causing poor or unstable connections.

Other things to check


If you have ever adjusted your router settings, check these again. For example, MAC filtering will prevent new devices from connecting to your network.

Check the DHCP settings on your router, particularly if it has any limitations set. For example, you may not have enough IP addresses available for all your devices and pods.


Ethernet connected devices
  1. If your wired device is not connecting to the network, try power-cycling the pod while the device is still connected by Ethernet.

  2. Try another Ethernet cable. Ethernet cables can often fail, causing poor or unstable connections.


Other things to check
If you have ever adjusted your router settings, check these again. For example, MAC filtering will prevent new devices from connecting to your network.

Check the DHCP settings on your router, particularly if it has any limitations set. For example, you may not have enough IP addresses available for all your devices and pods.


Other devices


Sonos Installation tips

Avoiding Interference


If you are having trouble with your Sonos Speakers (playback issues, trouble pairing speakers, players disappearing from the controller in the App), the most likely cause is wireless interference.

JT Total Wi-Fi’s optimizer already will have chosen the best channel for use in your network, so the cause is likely that your Sonos is too close to another wireless device or your pods. Keep your Sonos at least 3 feet away from your pods and other wireless devices to avoid these issues.

Wiring Sonos Speakers


We recommend that you connect one, and only one, of the Sonos devices (Sonos speaker, Sonos Connect or Sonos Boost*) via Ethernet to one of the Plume pods and have the rest of your Sonos devices connect via their wireless to the network. This enables the Sonos speakers to form their own ad-hoc network, independent of the Wi-Fi network in the house (BOOST mode).

*If you have a Sonos Boost device, if possible, that should be the one device plugged into the Ethernet port on the Plume pod.

Connecting multiple speakers to Plume pods will cause a network loop issue so please make sure that only one of your speakers is hardwired to a pod.

Remember to power cycle the pod after connecting the Ethernet cable so the pod will properly recognise the device and keep the Sonos player at least 1m 3 feet away from the pod.

Connecting Sonos to Plume using Wi-Fi


If you want to connect your Sonos players to your network using Wi-Fi, make sure that you've updated their firmware to version 45.1-56150 or later. If you are running an older version of Sonos firmware when connected over Wi-Fi, the players will lose their connection whenever the Plume network sends out a Channel Switch Announcement (CSA).


Why can't I connect my Sony PSP to Plume?

Issue Description


To ensure the security of your network, SuperPods currently only support WPA2-PSK AES since older security standards are easily compromised with little effort. As a result, older devices like the Sony PSP that only support older Wi-Fi security standards (such as WEP, WPA or WPS) will not be able to connect to the SuperPods.

Workaround


If you absolutely need to connect an older device to the Wi-Fi, you can re-enable Wi-Fi on your JT Router with a different SSID that can be used specifically for the older device.

Because you are going to use an inherently weaker security standard for this SSID, it should always be turned off when not in use.

If the device in question also has an Ethernet port, connect it to a pod by Ethernet instead.


I have an ASUS router with AIProtection and my pods are not coming online

Issue Description


SuperPods are not connecting to the Plume cloud and will show as offline when plugged into an ASUS router that has AIProtection enabled. ASUS AIProtection supported router models: https://www.asus.com/us/AiProtection/

Cause of issue

SuperPod traffic is being classified incorrectly as part of a spoofing vulnerability by the ASUS AiProtection Dual-Way IPS Protection, which blocks the device from connecting to the Plume cloud. ASUS's Security Interface will show something similar to the following:

2020-02-01 19:36:12,M,Device Infected,192.168.50.140,SERIAL_NUMBER_Pod_900200700,FILE Microsoft Windows CryptoAPI Spoofing Vulnerability -2 (CVE-2020-0601)

2020-02-01 19:36:08,M,Device Infected,192.168.50.54,SERIAL_NUMBER_Pod_900203800,FILE Microsoft Windows CryptoAPI Spoofing Vulnerability -2 (CVE-2020-0601)

2020-02-01 19:36:03,M,Device Infected,192.168.50.141,SERIAL_NUMBER_Pod_900203800,FILE Microsoft Windows CryptoAPI Spoofing Vulnerability -2 (CVE-2020-0601)

https://cve.mitre.org/cgi-bin/cvename.cgi?name=CVE-2020-0601

Solution


AiProtection stays in sync with Trend Micro’s cloud database to get the latest signatures for the Intrusion Prevention System, including: Malicious Site Blocking, Infected Device Detection, and Blocking, and Content Filter features.

In order to fix this issue, Trend micro launched the Signature Version 2.162 for ASUS Routers. In order to update the "Signature Version", go to Asus Web Interface > Administration > Firmware Update, Check for Signature Version 2.162 or above.


My Nest Cameras are turning off

Why do I frequently have turn my Nest Cameras back on?


If you seem to have the need to frequently turn streaming for your Nest Cameras back on, you may have the Home Away/Assist Feature activated. This Feature will automatically toggle your nest cameras On/Off depending if you are home or not.

To configure set your cameras to always stream, follow the steps below:

  • Go to the Settings menu in the Nest App.
  • Select Home/Away Assist.
  • Select Either Home or Away and you'll see a list of all your Nest products, including what their current behavior is set to when you are at home or away from home.
  • To have the cameras streaming permanently, you can select On in either menu for every device that you want to follow this rule.
  • Unless you manually change your status, Nest cameras only use your phone's location to determine if you are currently home or away.


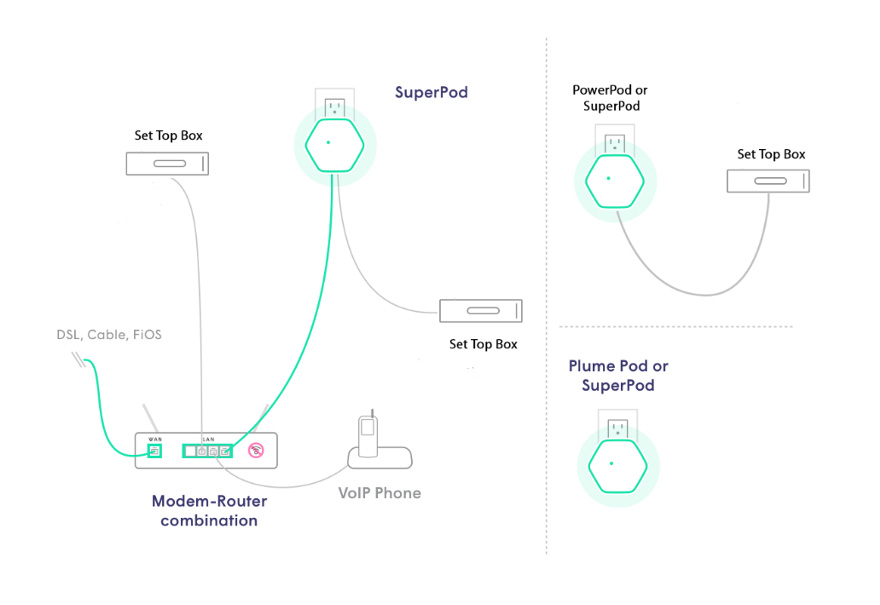
Adding a switch to my Pod
You can connect a switch to any pod for if you need more direct client connections.

Each Plume pod comes with two Ethernet ports that support both network or client connections, so you can hardwire your device or a switch to any of the pods to gain internet connection to your devices.

Pods may be plugged into a switch that is plugged into a router. This setup will allow you to take advantage of the existing wiring in your home and improve your network's performance. Please note that you may need to power cycle the pod you have hardwired to your device or switch for Plume to properly recognise it and add it to your network.